A motorcycle ground anchor is a vital part of any motorcycle security setup. Whether you park your bike outside or in a garage or a shed, a ground anchor provides a fixed point you can secure your motorcycle to, preventing it from being lifted into a van and making it a hard target for even the most determined thief.
When you chain your motorcycle to a ground anchor, you immediately eliminate a large proportion of motorcycle thieves who want to take advantage of easy pickings. Some thieves work in teams, quickly lifting an unsecured bike into a van, where they can then take the bike to a different location and work on defeating the security.
A ground anchor and chain means a thief has to come equipped with power tools. If they’re caught ‘going equipped’ is a separate offence in itself and carries a higher sentence.
A quality motorcycle ground anchor and a security chain already halves the chances of your bike being stolen.
What Is a Motorcycle Ground Anchor?
A motorcycle ground anchor is a hardened fixing point that bolts or sets into a hard substrate, such as a concrete floor, allowing a heavy security chain to be attached. Its purpose is to stop a bike being lifted, dragged or wheeled away.
A ground anchor itself doesn’t provide any additional security. It has to be used with a chain or another lock, like a D-lock, in order to secure your motorcycle to the ground anchor.
There are many ground anchors on the market, ranging from £20 to £200. While we don’t sell ‘cheap’ ground anchors, we maintain that any ground anchor is better than none.
However when you spend more money, you are likely to get a ground anchor that far exceeds any security standards, is made from better-quality materials, can accommodate larger chains, has more fixing points to prevent it being levered out of the ground and will withstand an attack for longer.
The most common ground anchors are bolt down but you can also get ‘bury in’ ground anchors, which required a bit more work to fit but do have their advantages. We’ll explain more on the different types below.
Floor versus wall
Ground anchors are usually located on the ground but some of them can be fixed to a wall too. Most of the time, a brick wall is a convenient location to fix an anchor, especially in a garage, where it not only prevents it from being a trip-hazard but it can also make it harder for thieves to attack.
Why Ground Anchors Matter for Motorcycle Security
A significant percentage of motorcycle thefts involve the thief lifting the bike from its location and taking it elsewhere to tackle the security. By fitting a ground anchor and using a high-quality security chain, you virtually eliminate this type of theft.
A ground anchor is just one of many layers of security that can deter a thief from even attempting to steal your motorcycle in the first place and if they do, it’ll help make their task a lot harder and much more likely to fail.
Even if you don’t have an anchor, if you can chain your bike to something immovable, you’re recreating the same advantages of a ground anchor. For example, you can loop your security chain through another motorcyclist’s chain to make your two bikes harder to lift. Or you can loop your chain around a lamp post. Anchoring is important, whether you use a ground anchor or not.
Types of Motorcycle Ground Anchors
Bolt-Down Ground Anchors

Bolt-down ground anchors, like the Torc Mega ground anchor, are the most common. In short, you drill holes into your substrate (usually concrete or brick) and then use bolts to secure your ground anchor to the surface. You can fit a bolt-down ground anchor in as little as 20 minutes.
Different fixing types
By far the most common method is to fix your ground anchor with expanding bolts.
Here at Pragmasis we offer expanding bolt fitting kits and resin kits.
Expanding bolts
Once you’ve drilled your holes, you drop an expanding anchor shield into the hole. You then locate your ground anchor and wind the bolts down into the hole and the anchor shield. As you wind your bolt in, it forces the anchor shield to expand and it’s this expansion that helps the shield ‘grip’ to the internal surface of the hole you’ve drilled.
Virtually all ground anchor manufacturers use expanding bolts to secure their ground anchor. Cheaper ground anchors will only offer two fixing points, while better quality ones will offer four fixing points. An anchor will just two fixing points is far less secure against lever attacks.
Resin capsules
Here at Pragmasis we offer expanding bolts but we also offer resin capsules. The resin method is similar to expanding bolts but offers a stronger fix. You drill your holes and then drop a resin capsule into each hole. When you wind your bolts through the anchor and into the hole, you pierce the resin capsules, which then cure and set. The resin makes its way into all the tiny gaps in the substrate surface and provides an extremely strong fix.
As far as we know, we’re the only firm offering resin fixing. As well as supplying resin capsules, we also supply larger tubes of resin, which can be used where the substrate is of a poor quality. The additional resin will find its way into any gaps and create an extremely strong bond.
Van fitting kits

We also offer van fitting kits, which allow you to securely fix your ground anchor to the floor of your van. These fitting kits pass through the floor of your van and are secured using shear nuts on the exterior. These are very hard to defeat, especially when they’re located on the underside of your van!
Bolt-down ground anchor pros:
- Easier to install
- Just basic tools required
- No digging
- Suitable for floors and walls
- Works in brick and concrete
Bolt-down ground anchor cons:
Not everyone wants a raised fixed object on their garage floor
Looking for a bolt-down ground anchor option?
The Torc Mega Ground Anchor is designed for concrete floors, garages and workshops and accepts 22mm+ chains.
Concrete-In Ground Anchors

The other common type of ground anchor is a concrete in or bury-in ground anchor. These are concealed in the ground with no or very limited exposed fixings.
In short, you dig a hole, locate the bury-in ground anchor and then pour concrete around the ground anchor. Get it right and you’ll have a nice level piece of concrete with the ground anchor flush to the surface.
They’re harder to install and take a lot more skill and time to fit. Typically, they might take a day to fit, depending on how and where you fit them. However if you are laying a new floor in a garage or resurfacing your driveway, that’s a good time to consider a bury-in ground anchor.
Due to the fact they’re buried in the ground, there’s little left for a thief to attack. However not all ground anchors of this type sit flush to the surface. Some stick up, even if only a few centimetres and they can present a trip hazard.
Concrete-in ground anchor pros:
- Extremely strong when installed correctly
- No exposed fixings
Concrete-in ground anchor cons:
- More expensive
- Requires more time and skill to fit
- You’re limited to where you can fit them
Wall Anchors vs Floor Anchors

As mentioned previously, you don’t just have to fix your anchor to the floor. You can also fit a ground anchor to a wall. This is particularly common in garages, where the wall not only helps limit access to the anchor, making it harder for thieves to attack but by mounting your anchor on a wall, you keep it off the floor, removing a potential trip hazard.
Not all anchors can be fitted to a wall – you need to read the fitting guide for the particular anchor you’re buying. However all Pragmasis ground anchors can be fitted to walls, including brickwork and blockwork.
The resin fixing advantage
Most of the time, you’re far better off mounting a ground anchor to a wall using resin fixings. This is because expanding bolts can crack brick or block work.
If you mount your ground anchor with expanding bolts very close to the top, bottom or edge of a brick wall, you are increasing the chances of the brickwork cracking, due to the expansion force of the anchor. With a resin rising, you simple drill a hole, fill with resin, secure your bolts through the anchor and into the resin and wait for it to set.
Before mounting your ground anchor to any surface, you should always check the quality of the substrate and the location you’re planning on fixing it to. If you’re adding a ground anchor to a garden wall for example, you might be in danger of drilling through the entire brick, leaving bolts exposed on the opposite side.
Removable ground anchors

You might think that ‘removable’ is the last thing you want your ground anchor to be but stick with us! Some people – often those renting their property – want to be able to install a ground anchor but their rental agreement prevents installing anything that can’t later be removed.
That’s where a removable ground anchor comes in.
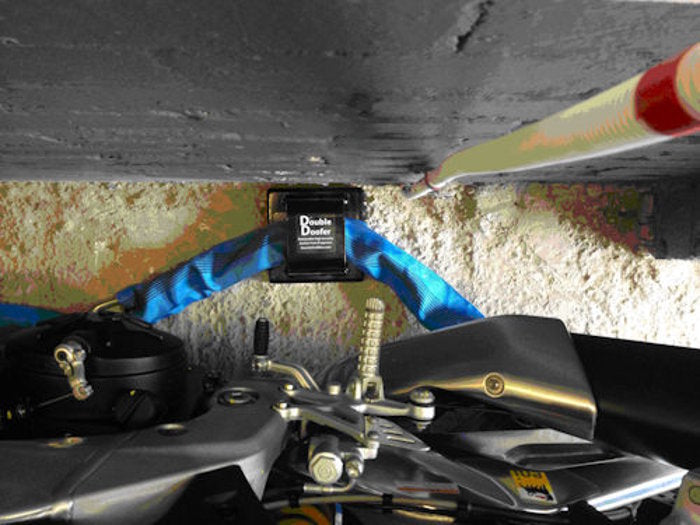
Here at Pragmasis we have developed the Double Doofer; a ground anchor that’s just about as strong as anything on the market but with the added advantage that you can remove it when you move property.
The Double doofer is essentially a high quality ground anchor that uses expansion bolts to secure it to the ground. You then cover this with the top plate and bolts this in place. When you run your motorcycle security chain through the Double Doofer, it prevents the top plate from being lifted up and the bolts being accessed.
When you’re finished with it, you’ll just leave four holes in the ground, which can be easily remedied.
Temporary or DIY Anchors (and why they’re limited)

We firmly believe that the best motorcycle ground anchor is the one you actually use. Any anchor is better than none, and we know that not everyone can justify the expense of a quality ground anchor.
There are lots of clever ways you can anchor your bike, even if budget, tools or space is limited.
You can fit hammer-in-stakes, like our Portable ground anchor. We’ve sold these to clients who park their bike in the front garden and one who wanted a way to secure his bike outside of his static home. With our Portable ground anchor, the stakes are hammered in at opposing angles, making them incredibly difficult to pull out. Impossible, really for even a couple of people to do.
There are similar versions you can screw into the ground. However these are usually designed to hold tents down or secure garden furniture like benches and have limited ability to withstand attack.
You can also create a fairly credible ground anchor by filling a bucket with fast-setting concrete and fitting an anchor into the concrete. The level of security this offers depends on what you use as the anchor and how big a bucket you’ve got! It would certainly make your bike more unwieldy for anyone lifting your bike into a van. But remember, most motorbikes weigh around 200kg and we’ve seen three guys lifting bikes into a van without much of an issue. An additional 10kg of concrete probably won’t slow them down too much.
A purpose-built ground anchor is almost always going to be better.
How to Choose the Right Ground Anchor
Security Ratings and Certification

You may be installing a ground anchor because your insurance stipulates that you need one. In which case make sure that the ground anchor you install meets your insurance company’s requirements. Often those with a Sold Secure rating will be recognised by insurance companies.
All of our ground anchors have been tested to the Sold Secure Gold standard. However, not all anchors that meet the Gold standard offer the same protection.
We don't produce a cheap ground anchor like the one picture above. This design is too easy to pry from a wall or the floor, due tp the fact it only has two low-quality fixings. It's also easy to cut.
A ground anchor with two fixings and a 5mm thick body can meet Sold Secure Gold. However, an anchor like our Beefy Bridge uses four fixings and has an 8mm thick top plate and 10mm thick base plate.
I know which one I’d rather secure my bike to.
Chain Compatibility and Aperture Size

Buying motorcycle security can be complicated. Not only do you have to factor in different types of security, from disc locks, padlocks and chains, to covers and ground anchors, but you also have to think about the locations you’re going to leave your motorcycle in. Then you have to factor in where you’re going to focus your budget and also ensure you don’t have any clear weak links (pardon the pun) in your security setup.
When it comes to ground anchors, remember that not all anchors can accommodate larger chains. Some of the basic ground anchors can only fit a 13mm thick security chain.
On the flip side, there’s probably not a lot of point buying a top-spec ground anchor that can accommodate a 22mm chain, if all you’re left with is enough cash to buy a 10mm thick chain.
Here at Pragmasis, all of our ground anchors can accommodate our 13mm, 16mm and 19mm chains.
If you park your motorcycle outside overnight, we’d recommend a minimum of 16mm chain and, if it’s staying put, go for as thick a chain as you can afford.
Our 22mm noose-end chain is an absolute BEAST but you won’t be able to take it with you. So it’s not ideal if you need to carry your chain around.
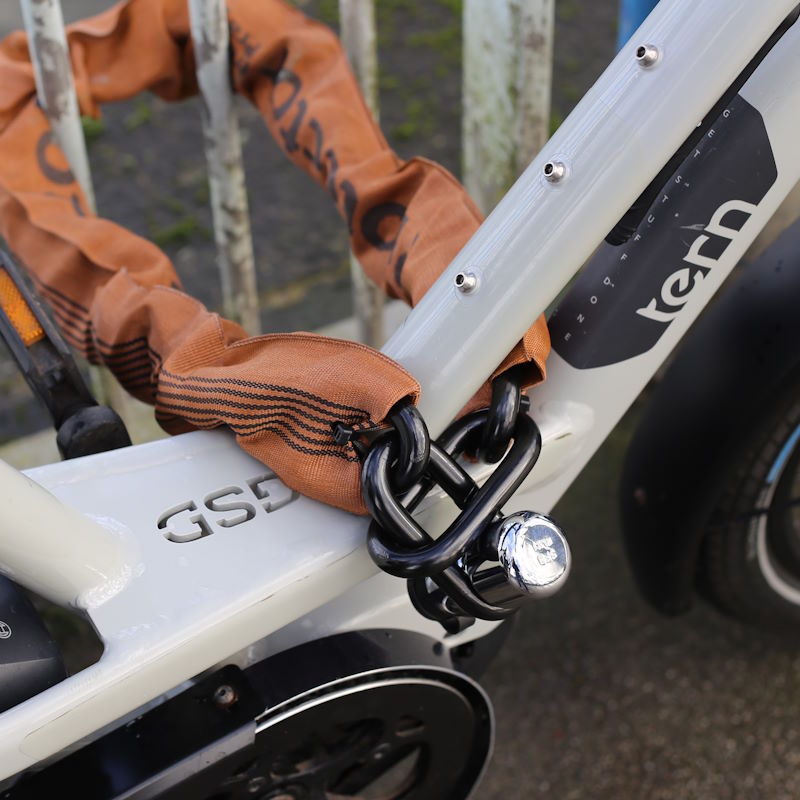
Noose chains are great because you effectively need less chain to secure your bike. You can wrap the chain around a fixed object and then pass it through the larger ring to create a noose. You then fix that end to your bike, to prevent it easily being lifted away.
Try and balance out your security. If you fit a £200 disc lock, the thieves might just cut your brake discs to bypass it. And if you only have a £30 chain, you’re not going to be seeing that bike again.
Layer your security, make the thieves have to jump through as many hoops as possible. Time is their enemy.
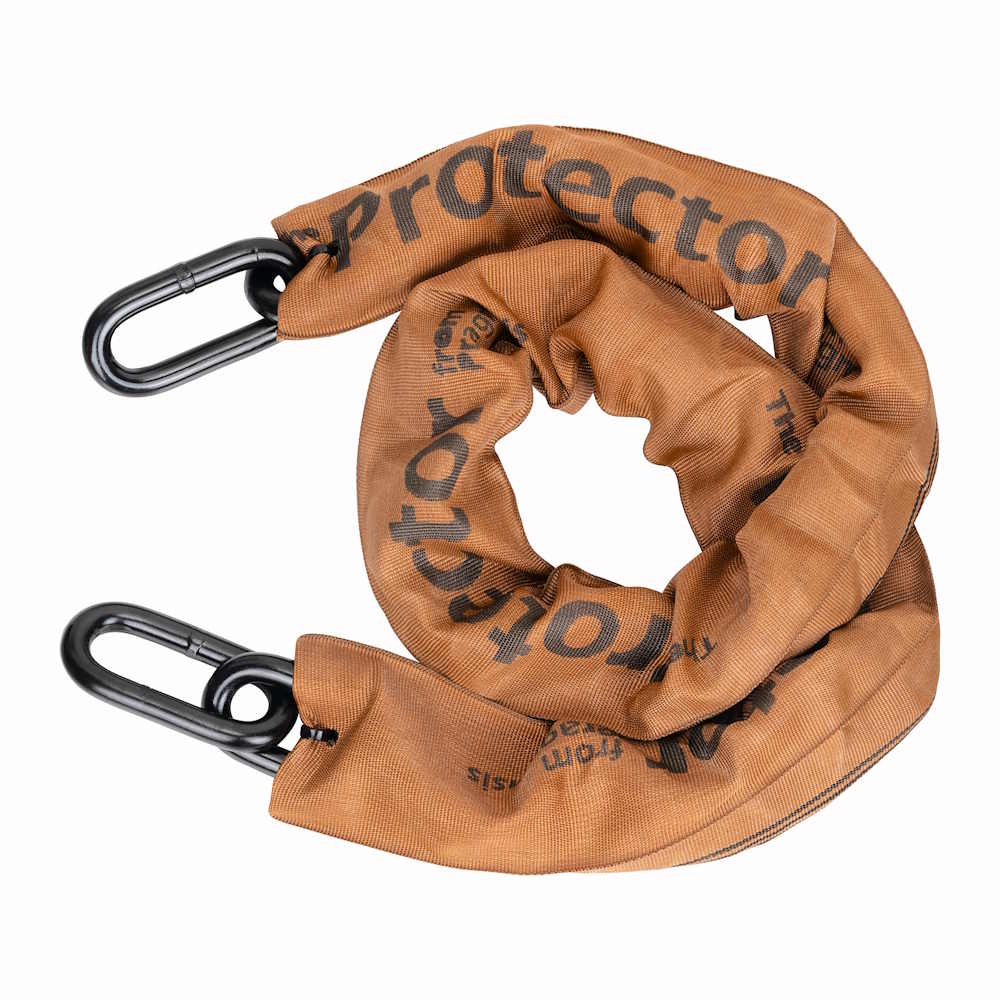
If you're looking for a high quality chain, check out our Protector series of high-security chains.
The tools you’ll need
When you’re installing a bolt-down ground anchor, at a minimum you’ll need these tools:
- Hammer drill
- Eye protection
- Medium-sized hammer
- Marking pencil
However, not all ground anchors are supplied with the full fitting kit you might need. At Pragmasis we supply our ground anchors will full fitting kits, including the correctly sized drill bit, a brush and pipe to help clean out the hole and the hex bit to drive in the bolts.
Check the requirements of the particular ground anchor you’re buying and make sure you have all the right tools and means to fit it.
Preparing the surface
Before fitting the ground anchor, it’s best to check the substrate you’re planning on fitting it to. Not only that but it’s well worth following the old adage of ‘measure twice cut once’ when it comes to the actual location where you want to install it.
When it comes to the substrate, we recommend you fit a ground anchor into concrete that’s at least 100mm deep.
Before drilling your first hole, ensure the area is clear of pipes or cables – use a detector if you are unsure.
If you place the anchor in the corner of your garage, not only will it present less of a trip hazard but it will also make a thief’s life harder, due to the fact that your bike will get in the way of the anchor and the majority of the chain.
Before you fit the anchor, make sure you can actually fit your chain through it first!
Basic installation steps (bolt-down anchors)
When you’re installing a bolt-down ground anchor, the method is pretty much the same, no matter whose anchor you’re fitting.
The fitting process goes something like this:
- Position anchor
- Mark holes
- Drill holes
- Clean holes thoroughly
- Install fixings
- Tighten to correct torque
- Make fixings tamper-resistant
My advice slightly different to the above. First, position your anchor, drill your first hole and then clean it out and install your first fixing. It's really important to properly clear out the dust from the hole you've just created. It will help you make a much firmer fixing.
Done? Then move on to the next hole.
We’ve had countless calls and emails from customers who have drilled four holes, poured resin in those holes, sunk the first few bolts and then realised that they can’t get a bolt into one of the remaining holes as it’s all slightly off.
That’s the beauty of taking it one hole at a time.
Common installation mistakes to avoid
Installing a ground anchor isn’t hard (especially a bolt-down type) but over the 20+ years we’ve been making and selling our own ground anchors, we’ve definitely made a few mistakes while installing and we’ve heard of lots more via our lovely customers.
The number one thing we say to customers is to READ the fitting instructions a couple of times. Don’t just open the box, get the tools out and get cracking. That’s where I think most of the issues occur.
But here’s a list of things you should consider (and avoid!)
-
Don’t install into weak concrete – you’ll probably get three bolts in and the fourth will crack the concrete in multiple places and you’ll have an expensive doorstop.
-
Wait for your concrete to dry properly – We’ve had some customers who have been keen to finish screeding their floor and then installing their ground anchor only to find that their floor crumbles like a Crunchie when they tighten their expansion bolts because the concrete hasn’t cured.
-
Hitting pipes – Either pipes or cables. If you’re unsure what you’re drilling into, take your time and check it properly.
-
Leaving out the shackle – Our Torc Mega is a two piece ground anchor with a base plate and a shackle. We’ve had a few customers install the base plate and then realise the shackle’s sat there in the box. Check and check again!
-
Popping brickwork – If you’re installing a ground anchor into a wall, you have to be careful not to locate the ground anchor too high on the wall (a thief can just smash anchor and destroy the wall) or too close to an edge, so that the expanding bolts pop the brickwork or mortar, potentially causing a large fracture in the wall.
-
Make sure you have a capable drill – A standard DIY combi drill with a hammer should be able to easily drill through brick and it’ll be capable of drilling through most concrete given enough time. However good quality concrete will laugh in the face of a typical DIY drill. Not forgetting your battery, which might give up after one or two holes have been created. You’re better off getting a proper SDS hammer drill (you can rent them). These eat concrete and, with the right drill-bit, will create four holes in seconds, making the job far more pleasant.
- Installing a really effective trip hazard – Before you install your ground anchor, have a proper think about how you use the area it’s being installed in. Don’t just go to install it next to where you last parked your bike. If the anchor’s in the middle of the garage, you’ll be forever stubbing your toes on it. If you position your ground anchor so that it's shielded by a wall and the object you're securing (see our main image at the top of this article), then it makes it very hard to attack the anchor or chain, effectively improving your security.
How Effective Are Motorcycle Ground Anchors in Real Theft Scenarios?

Most ground anchors can eventually be defeated. However just using a ground anchor, any ground anchor, eliminates a larger percentage of motorcycle thieves who just want an easy target.
A lot of the basic security chains (under £40 jobbies) can be split with bolt croppers quite easily and cheap disc locks can be smashed off with a hammer.
However when you up the security, you create a barrier that only power tools such as angle grinders can surpass.
Using a Ground Anchor as Part of Layered Security
A ground anchor and decent security chain not only delays a thief but it deters even more from trying.
A motorcycle parked on your drive overnight, that’s under a motorcycle cover and fitted with a disc lock and a decent chain attached to a ground anchor presents a very tricky target. The vast majority of thieves won’t bother and the ones that do will require a decent amount of time and tools to get your bike.
Recommended Motorcycle Ground Anchors
We’ve been producing motorcycle security for over 20 years and our very first product was the original Torc Mega ground anchor. We’re now on the third generation of this tried and trusted design.
The Torc Mega is a fold-flat ground anchor that can be installed on floors and walls, brickwork and concrete, inside or outside. It’s has a 22mm thick shackle and is Sold Secure Diamond rated. It can be supplied with expanding bolts or resin fitting kits and it’ll accommodate chains up to 22mm in thickness.
The Beefy Bridge is a more traditional heavy-duty ground anchor made from 8mm-thick welded steel. It is Sold Secure Gold rated and can accommodate chains up to 19mm in diameter. It weighs a hefty 2.4kg and presents a serious obstacle to any bike thief.
The Double Doofer is a removable ground anchor that has passed Sold Secure Gold testing. It’s a clever design that’s ideal for those renting their property. It can accommodate chains up to 19mm in diameter. The double-layered design makes it one of the strongest ground anchors on the market.
All of our ground anchors come with a 10-year warranty and are supplied with a full fitting kit, even including the drill bit!
Frequently Asked Questions
Do ground anchors stop motorcycle theft completely?
They don’t, but they massively reduce the chances of your motorcycle being stolen. A motorcycle secured with a high security chain to a ground anchor is statistically as likely to get stolen as the average family car.
Is a bolt-down anchor as secure as a concrete-in anchor?
This is hard to answer as it depends on a range of factors, including how strong the anchor is, how many fixings it has and the substrate it’s bolted into. The same goes for a bury-in ground anchor; they are not all made to the same standards and the way in which they are installed makes a big difference to the level of protection they offer.
Can I install a ground anchor on tarmac or paving slabs?
We don’t recommend installing into tarmac as it doesn’t offer enough strength to hold an expansion bolt. If you want to install into tarmac, we advise you cut the tarmac out, fill a hole with concrete, cover this with the tarmac and then install the anchor through the tarmac and into the concrete. Paving slabs are a no-no, due to the fact they are easily dislodged or destroyed in a kinetic attack.
What chain size should I use with a ground anchor?
We’ve recommend a minimum of 13mm for any security setup involving motorcycles.
Do insurers require ground anchors?
Your motorcycle insurance company may require you to use a ground anchor. Some may offer a discount if you do. It’s worth doing some research here as a ground anchor may save you a bigger discount on your insurance than the anchor costs to buy.


Leave a comment
All comments are moderated before being published.
This site is protected by hCaptcha and the hCaptcha Privacy Policy and Terms of Service apply.